


Horticulture
The UI Extension, Franklin County office provides programming and resources on a variety of horticulture issues.
Upcoming Events
Check the calendar
Apple Grafting
May 6, 10 a.m. to Noon. Preston
For more information call the UI Extension office at 208-852-1097
Resource for Idaho Gardeners
University of Idaho Extension has recently published a Spring Vegetable Planting Guide, BUL965 for Franklin County gardeners should follow the guidance for Zones 3-4.
Training Young Shade Trees
Planting a tree is a long-term investment. Learn how to prune young shade trees to create healthy branch structure and prevent problems when the tree is grown.
Tips for Franklin County
No medical advice here. I’m referring to the low-growing, sprawling growth form of some of the weeds plaguing our yards and gardens. Knowing what you’re fighting will help you invest resources where they will do the most good. The following are some of the more challenging ‘flat landers’ to control.
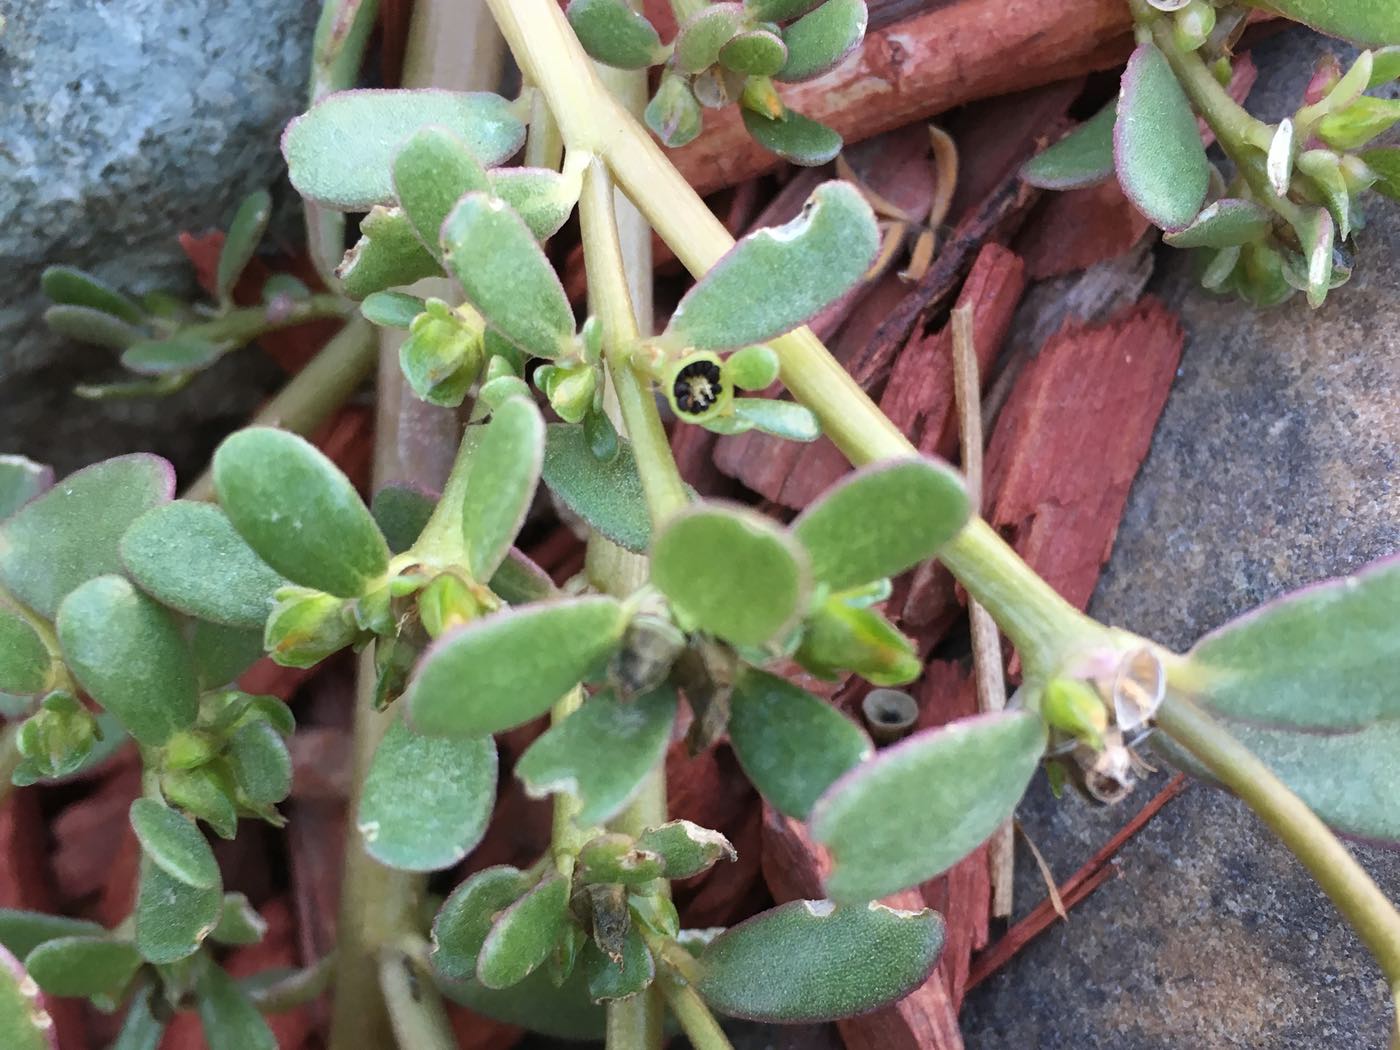
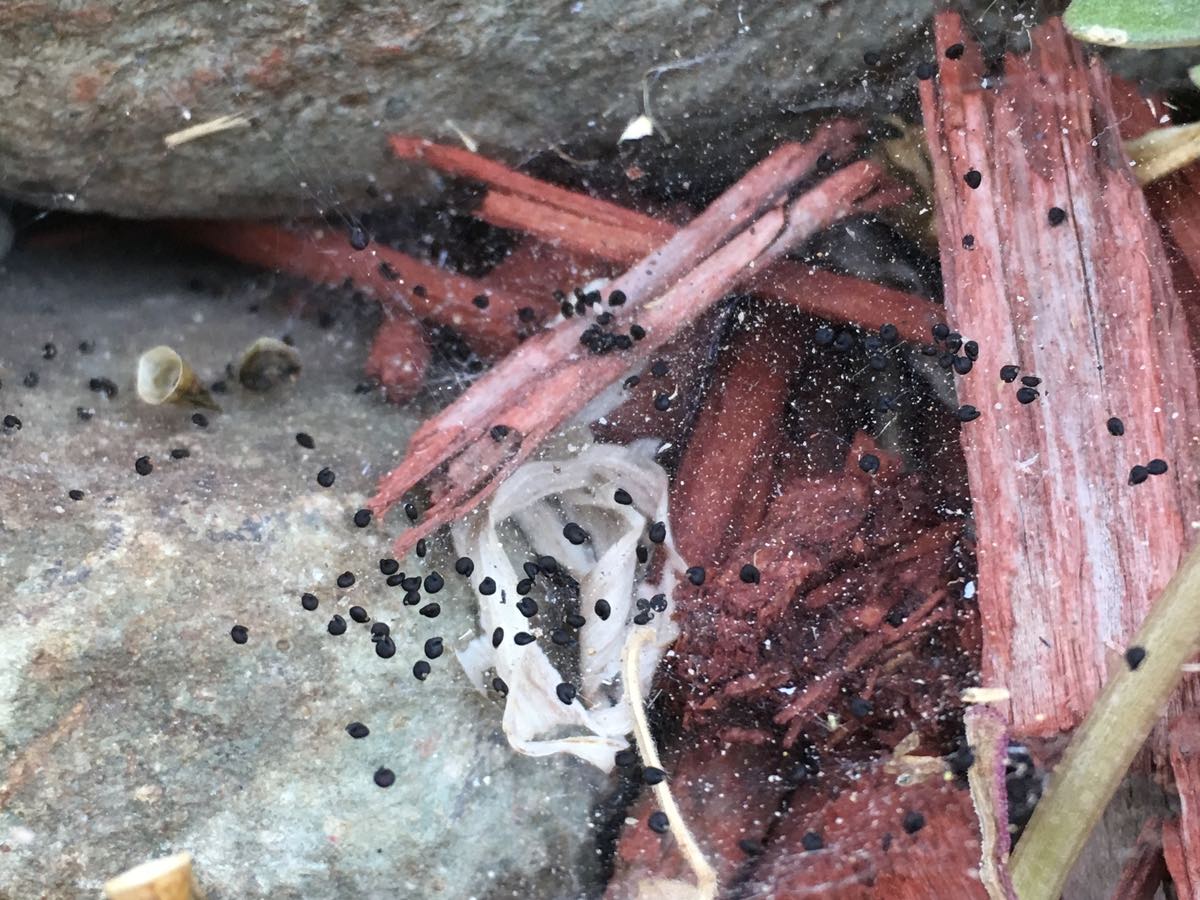
Common Purslane (Portulaca oleracea)
This fleshy succulent thrives in flower beds and gardens that have sporadic weeding efforts (like most of ours). It has fat, rubbery leaves with reddish margins and reddish stems. Flowers are small and yellow but mostly inconspicuous. Purslane is a summer annual that reproduces from seed every year. Spraying herbicide right now will do nothing to control next year’s new seedlings. A robust specimen will have already produced and partially dispersed over 100,000 seeds. Removing existing plants will remove many of the seeds but your only real hope is a pre-emergent applied next year before seedling germination. Next year remove new plants early and often. Get rid of the plants as stems can root if left on the soil.

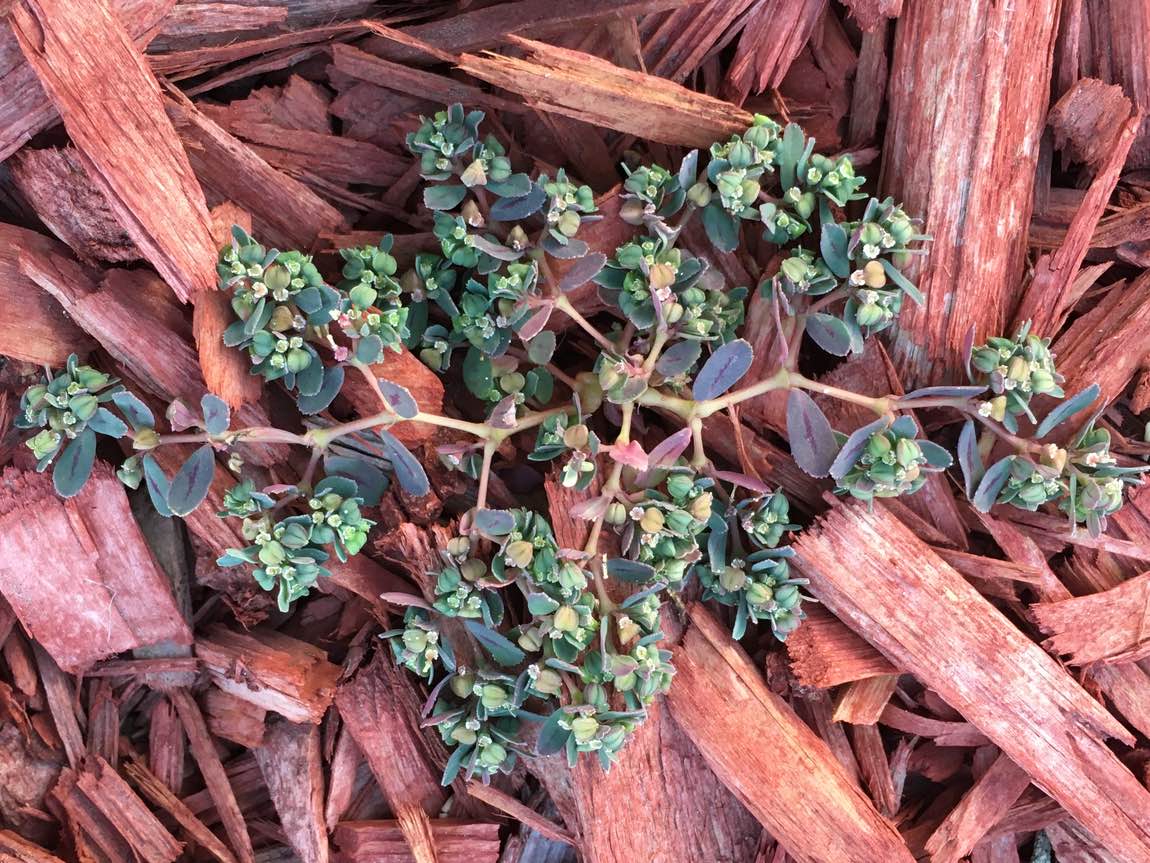
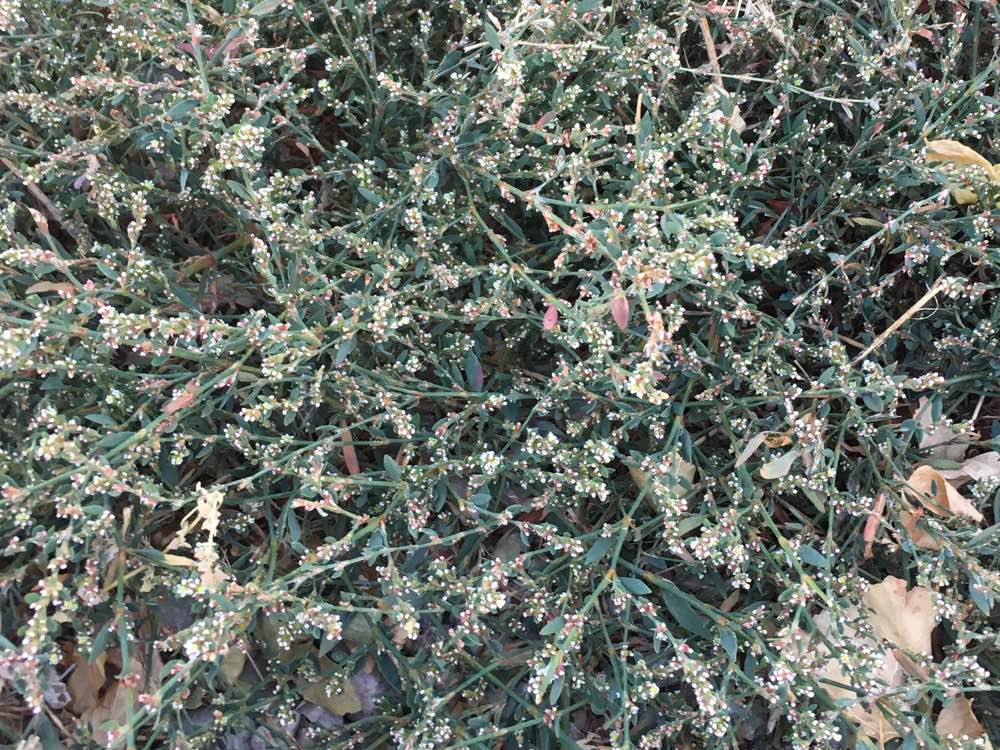
Spotted spurge (Euphorbia maculata)
This has a similar appearance to purslane but lacks the fleshy leaves. Its flowers are pink to white but similarly inconspicuous. Spotted spurge, sometimes called prostrate spurge, tends to appear later than purslane and is much easier to weed out. It is also a summer annual, so herbicide now is not helpful. In fact, many have been damaged by our first frosts. Remove current weeds and dispose of them (simply to eliminate as many seeds as possible). Pre-emergent herbicide next year is again your best bet.
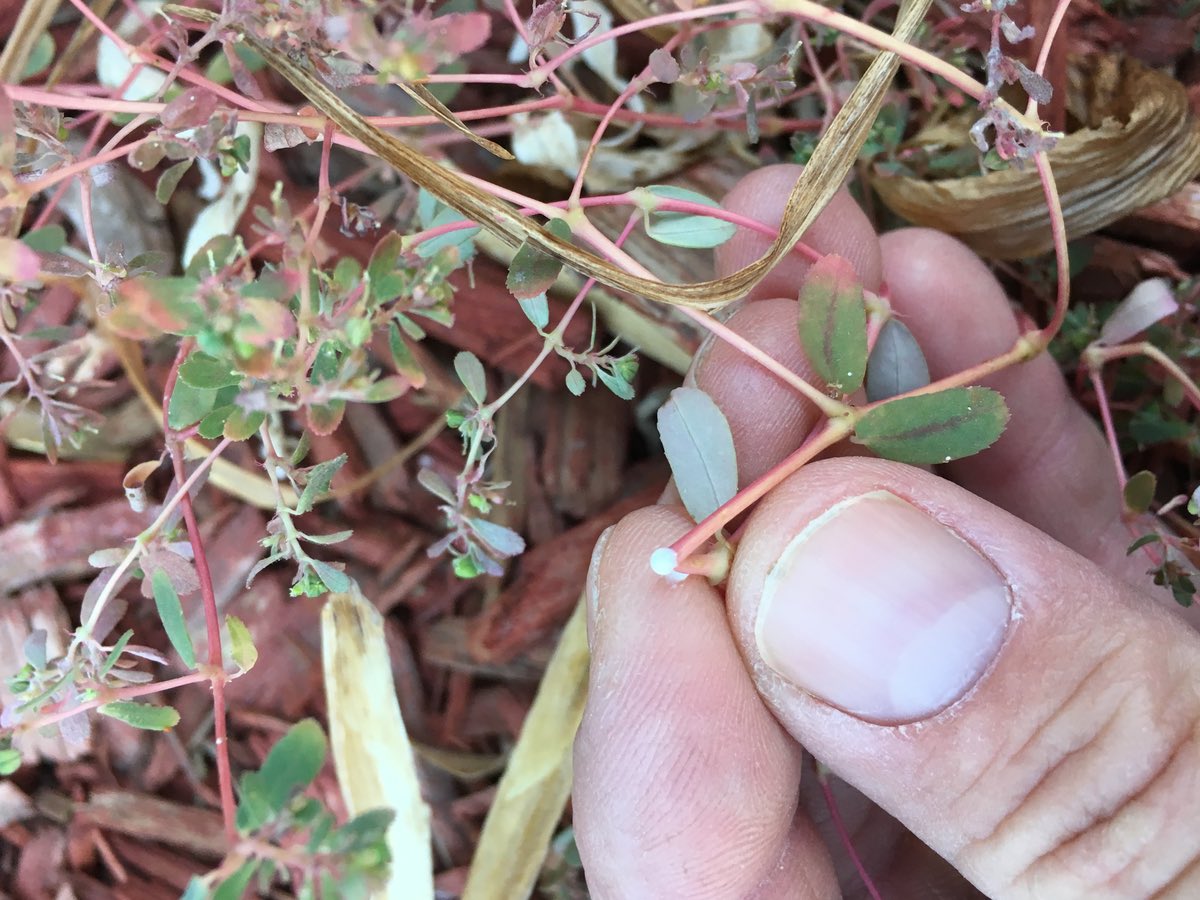
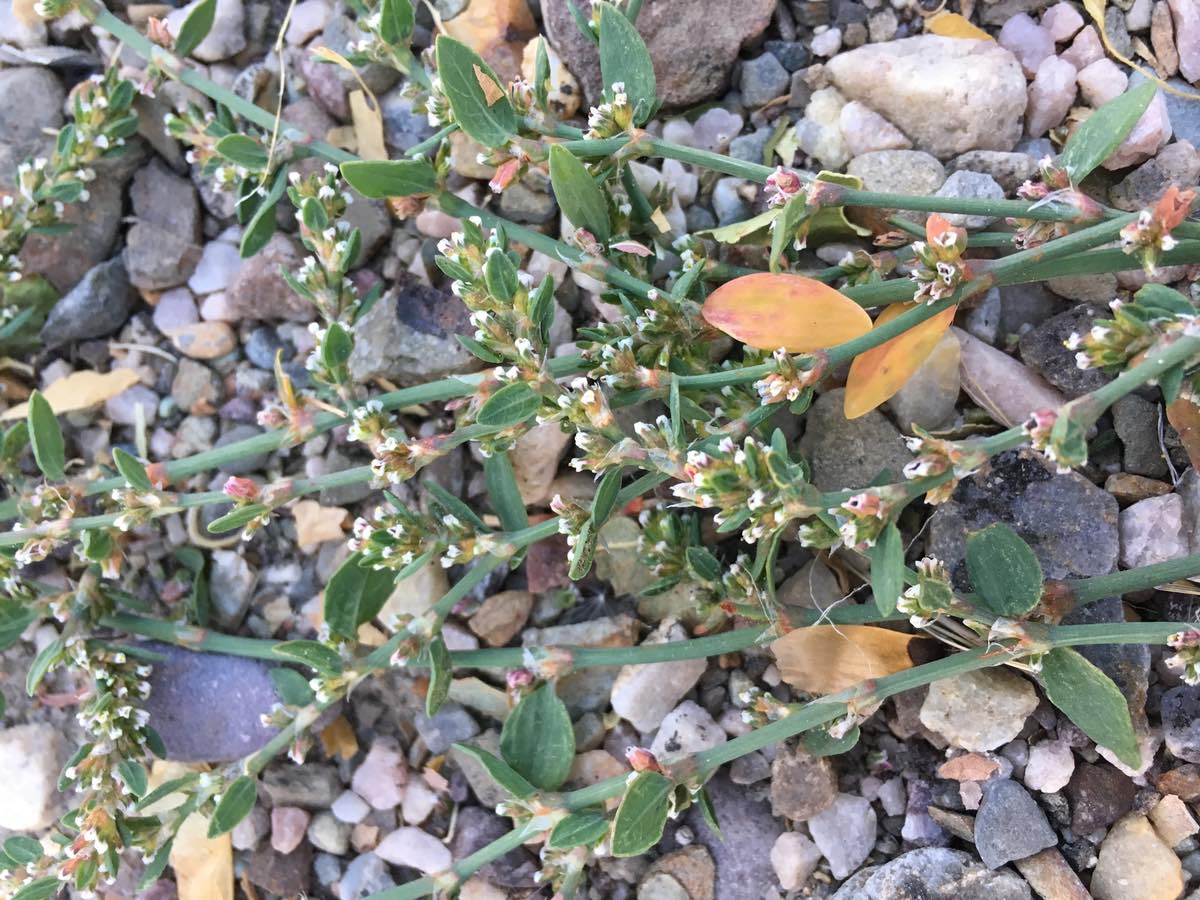
Prostrate knotweed (Polygonum aviculare)
More similar in appearance to spurge than to purslane, this weed tends to a more recumbent vining habit. Flowers are small and white. You tend to see this one more often in driveways, sidewalk cracks, and in weaker areas of lawn. Once again this is a summer annual. Herbicide application might be personally gratifying, but it won’t do anything at this point to control prostrate knotweed. Seeds have been sown and next year’s plants are on stand-by. Depending on the location, glyphosate or 2, 4-D + dicamba will control plants that are already growing. Pre-emergent herbicides of the ‘weed and feed’ type can help with control in lawn settings.
Field bindweed (Convolvulus arvensis)
You are probably all too familiar with this weed. Descriptive adjectives are best left unpublished. Bindweed, often called morning glory, is a perennial so fall herbicide application can be very beneficial. Glyphosate and dicamba can offer some of the best control but don’t expect elimination. Roots capable of producing new shoots are found to depths of 14 feet. Fragments of roots and rhizomes as short as 2 inches can form new plants. Fall is a great time to hit its root reserves hard. Next year hit it early and often with herbicide where you can and pulling where you can’t. Every time you remove shoot growth you deplete root reserves. Keep at it and in time you will see much less bindweed.

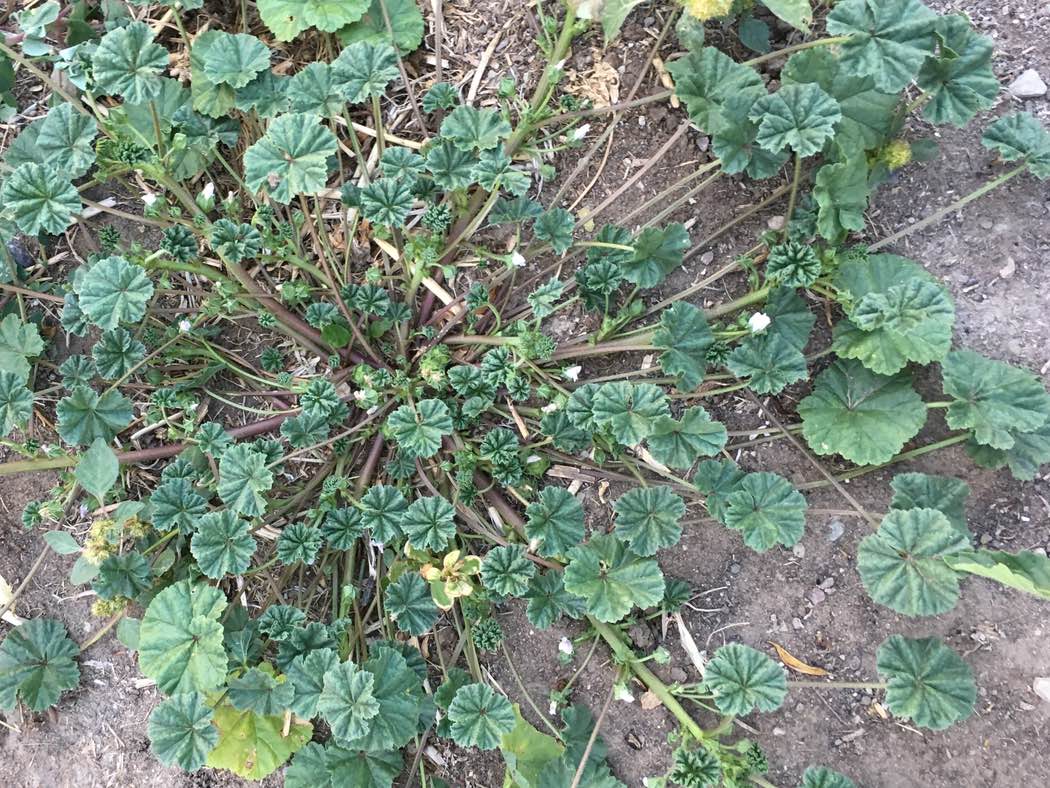
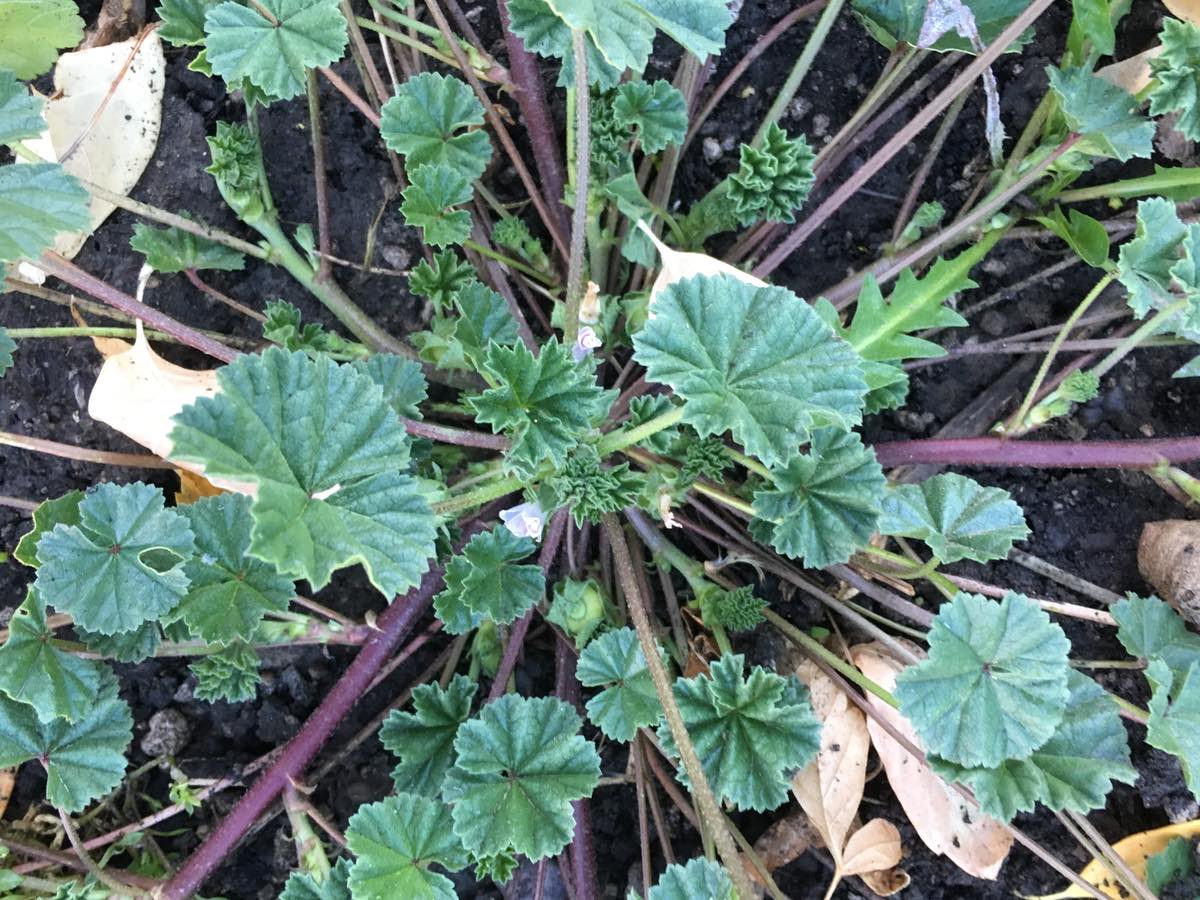
Common mallow (Malva neglecta)
This low-growing weed can be annual or perennial depending on conditions. You may know it as cheese weed, marshmallow weed, or bellybutton weed. Its leaves are circular with wavy margins. Flowers are pink to white and characteristic seed pods are round and flattened. Juvenile weeds can be chemically or mechanically controlled with relative ease. Mature plants have a deep taproot and, for the most part, seem able to live through any herbicides thrown at them. Herbicides containing dicamba offer your best control, but it has enough soil activity that it should not be used on flower beds or gardens that will be planted next year. Where you can you’re better off using a knife or shovel to sever the taproot and work on controlling seedlings next year.
There are less-common creepers including black medic, puncture vine, and henbit. All are annual weeds. Black medic is related to clover and alfalfa and is mostly a lawn nuisance. Henbit germinates in the fall so any pre-emergent efforts should happen now. Puncture vine is the bane of bike tires with its sharp seedpod. Sandy soils are its preference. All efforts to eliminate seeds need to be taken. Herbicide containing Chlorsulfuron is best at preventing germination in roadways and other non-crop areas.
Iron deficiencies are a common problem in our area. This is because the iron is made unavailable to plants due to elevated pH and the presence of lime in our soils. The primary symptom is a yellow leaf with a network of dark green veins. Yellow leaves indicate a lack of chlorophyll.
pH is a measure of the acidity or alkalinity of a material. The pH scale ranges from 0 to 14, with 7 being neutral. A pH value below 7 indicates the soil is acidic, while values above 7 are alkaline. Most southern Idaho soils contain free lime, with related soil pH values ranging between 7.5 and 8.2. Our water is also often alkaline which compounds long-term management difficulty.
The following is a summary of how to manage iron chlorosis in our yards and gardens:
Prevention
It is much better to select plants that are tolerant of high soil pH and less likely to be affected by low iron availability. Maples, aspen, raspberries, peaches and grapes commonly exhibit symptoms of iron chlorosis. You can also encourage health plants through good cultural practices by not overwatering, not overusing nitrogen and phosphorus fertilizer, and by adding compost.
Use EDDHA Iron Chelate
Chelated iron work much better in our soils than the cheaper iron sulfate or iron citrate. Chelated iron is in a form that helps prevent the iron from becoming unavailable to plants in high pH soils. There are different types of chelates but for our soils we should use EDDHA iron chelate. It is typically the most expensive, but it is also the only chelated iron that doesn’t quickly oxidize in our soils. Examples of EDDHA iron chelates are Miller’s Ferriplus (Miller Chemical), Sequestrene 138 (Becker Underwood), Sprint 138 (BASF), and Sequestar Iron (Monterey). For others, look on the label for the EDDHA acronym.
Soil Treatments
We cannot reduce pH over an entire landscape. Instead, treat small areas by making holes 12 to 18 inches deep, spaced about every two feet around the drip line (outer edge of crown) of affected trees and shrubs. Place 1-2 cups of a 50/50 mixture of iron sulfate-elemental sulfur (or use chelated iron for better results) in each hole and cover with soil. Over time, the concentrated sulfur in the holes neutralizes lime and lowers soil pH in a small zone around the treated areas. EDDHA iron chelate can also be delivered through drip irrigation. The iron material is mixed in solution then injected into the drip lines via a fertilizer injection system.
Foliar Treatments
Iron can be delivered to plants by spraying an iron solution directly on the leaves. A 0.5 percent solution is formulated by dissolving 2 ounces of iron sulfate (20 to 22 percent iron) in 3 gallons of water. Add a few drops of a wetting agent or spreader/sticker surfactant to help the solution absorb into the leaf tissue. Simply spray onto the vegetation, seeking to completely cover the foliage. Chelated forms of iron can also be used for foliar treatment. This is not critical with foliar treatments because the high pH soil is circumvented. A few points to remember:
- Don’t use the same sprayer that you use for weed control as residual herbicide may cause injury.
- Foliar treatments should be avoided when fruit are present.
- Foliage should be sprayed in the evening or on a cool, cloudy day to prevent leaf burning.
- Solutions should not be stored after mixing because the iron will oxidize and fall out of solution.
- Repeated applications of foliar sprays may be needed throughout the growing season.
Trunk Treatments
Iron in dry or liquid form can be placed directly into holes drilled into the lower trunk. This is effective, but it injures the trunk and should be used only when other methods have failed. Commercial formulations should contain iron citrate or iron sulfate. Medicap, Baicor and Arborjet are three companies that produce implant/injection iron products. As with foliar treatments, chelated iron is not necessary. The recommended rate is typically 1/8 to 1/4 teaspoon per-inch trunk diameter. Most wounds heal but this method opens the tree to increased risk of future decay and disease.
- Covering or capping holes can be done but this will not help or hinder the healing process.
- Treat in early spring as the tree is starting to bud out.
- Avoid treatment on hot, dry, windy days.
- Make sure the tree is well-watered for several days before and several weeks after treatment.
Extension Notes from The Preston Citizen
This summer has been long, hot and dry. As a result, some common issues have been appearing: spider mites and summer leaf scorch. Regardless of what the next few weeks of weather bring, you need to know the signs of each. If not this year, you are likely to see the symptoms in years to come.
Spider mites are near microscopic spider relatives that damage plants by sucking cell contents from leaves. They thrive in dry dusty conditions and populations can spike rapidly. Given favorable conditions their speedy reproduction rate allows them to rebound quickly following the application of common broad-spectrum insecticides that have eliminated natural predators.
Spider mites can attack a fruit trees, field crops, vegetables and ornamental flowers and shrubs. Initially their feeding can give a stippled to yellow appearance to the leaf. As the invasion intensifies leaves will begin to dry out and die. They create a fine webbing, often on the underside of leaves. Dust sticks to the web giving the leaf a dirty appearance. To really see the mites themselves you need magnification. Tap infected leaves on a white sheet of paper and the mites can be observed as "moving dust specks." For images simply search the internet for spider mites along with whatever plant you are concerned about.
The use of chemical miticides in commercial production can sometimes be necessary but it is important to rotate types of chemicals. Spider mite populations can quickly develop resistance to single chemicals. For homeowners the use of insecticidal soap or horticultural oil is a better treatment method. These are easier on beneficial insects and chemical resistance isn’t an issue. These work only through contact with the mites however so thorough coverage, especially on the underside of leaves, is crucial.
Summer leaf scorch can have visually similar symptoms to spider mite damage. It occurs to trees and bushes that aren’t getting adequate moisture from their roots. As plants transpire they lose water through their leaves. With prolonged hot weather roots aren’t able to supply the needed water and leaves can dry out. Trees and bushes can sometimes lose some to most of their leaves to summer leaf scorch. This is seldom fatal to established trees and shrubs. It is often more problematic when plants are experiencing other stress factors such as nutrient (often iron) deficiency or pest invasion.
This year the water supplied through efficient lawn irrigation may not be adequate to meet water lost to transpiration. If you see trees or bushes whose leave are browned around the margins it might be leaf scorch. If you have a tree that seems to experience new growth followed by periods of leaf dieback it might be leaf scorch. New transplants are especially vulnerable because root systems aren’t established. Suspect plants should be deep watered to see if symptoms are eliminated. A garden hose left for several hours at a trickle can accomplish this. Sandy or gravelly soils will accept water readily but dry out more quickly. Clay soil will have a slow infiltration rate and will require a longer water period to accomplish a deep watering. In general, new transplants need weekly deep watering. More established plants can go two-three weeks between deep waterings. If symptoms worsen or fail to improve following deep watering treatment, something else is likely at fault.
For further help call me at 208-852-1097 or bring a sample into the office. Pictures can also be emailed to brackenh@uidaho.edu. Utah State University has an excellent resource for our area when identifying and dealing with plant issues (utahpests.usu.edu). There are fact sheets about both spider mites and summer leaf scorch as well as a host of other topics. Their pest advisory system is specific to Utah but has targeted information to Cache County that is very applicable to us in the north end of Cache Valley.
There are seven basic principles of Xeriscape design, which you can start implementing in small steps, and can help begin saving water in your landscape.
- The first principle is to plan your landscape with water savings in mind. Define the outdoor area in your yard, their purposes and what you want them to feel like when you enter that area. For example, if you want an entertainment area then maybe a brick paver patio with shade trees surrounding it would be desirable.
- By planning your landscape so that areas have a purpose, you are able to go on to the second principle of Xeriscaping which is amending your soil for the plants, and location in your design. A very sandy soil will drain well, but in a water wise landscape we don’t need the soil drying out too fast, or the plant material can suffer, and water could be wasted. If your soil is sandy, then amend it with compost to help add nutrients and balance the water holding capacity.
- The third principle is selecting the right plant for the job. Turf grass for example uses the most amount of water in comparison to other types of landscaping. So in place of grass, use drought tolerant native plants in your landscape, which also require less maintenance as they do not need to be mowed and maintained like turfgrass. Use any existing and established plants in your landscape beds as they use far less water than new plants which need extra water to get roots developed.
-
Another principle in this process is to define the turf and no turf areas in your landscape, and then set your watering needs accordingly. Mixing turf grass and other types other plants still leads to high water usage, so clearly define and differentiate these areas. There are types of grass that handle the heat of summer better than other types of grass, and some can survive on less water than others. In essence choose the right type of grass for the right situation.
-
The next principle is efficient watering. Most water is lost through evaporation, run off, or goes down beyond the root zone. The best way to avoid loss is to water only when the plants need it, and this will also promote strong root development as the roots tend to grow deeper to seek after water. If you have an in-ground irrigation system, check it for leaks, damaged heads, or other issues to make sure that water is not being wasted.
-
The next principle is using different types of mulches to keep soil temperatures cooler and helps to maintain the moisture in the soil rather than evaporating away. Mulches can be shredded bark, soil pep, or compost. Gravel can also be used as a soil covering, but it does not hold onto the moisture as well as a mulch.
-
The last principle of Xeriscaping is using plants and landscape design techniques that are resistant to pests. These pests can include weeds, diseases, and insects. Select plants that have a natural resistance to diseases, have few insect predators, and that fill in space so that weeds do not have an open place to take hold and start growing in your yard. This helps to reduce the maintenance and cost of spraying or trying to manage a pest problem.
For any questions and further ideas regarding water use reduction in the landscape, please contact Lance Ellis at the University of Idaho Extension, Fremont County at 208-624-3102 or ellis@uidaho.edu.
Depending on the grass used, new lawns can be established by seed, or sod. Lawn establishment by sodding consists of laying previously grown sod pieces on prepared soil until the area is completely covered with the transplanted grass.
Prepare
Several days before planting or sodding, prepare the soil where your new lawn will be located.
First remove any buried debris that may be left over from construction projects. If buried cement chunks and boards are not removed, they will cause various problems later on.
Next, grade the grounds to the desired slope. Provide a slight slope away from the house for proper drainage. If the soil has been compacted, loosen it up by rototilling 6 to 8 inches deep. This is a good time to add compost or other needed fertilizers. If you want an automatic sprinkler system, it should be installed prior to planting or laying the sod.
Finally, rake the surface to a smooth finish and let it settle for about a week. If some settling occurs, it should be leveled once again. The soil surface should be firm enough that walking on it does not make deep foot impressions. Keep in mind the soil level should be about three quarters of an inch lower than the desired finished level.
Install
If you are sodding your new lawn, as soon as the sod arrives be prepared to install it. The soil should be moistened, then the first strip of sod should be laid along a straight board or piece of string. The next row should be staggered in the same manner that bricks are laid, so that none of the sod joints are in a line. Each piece should be fitted against the neighboring ones as tightly as possible. Sod can be cut with a large knife to make it fit around irregular areas such as trees, flower beds or sprinkler systems.
Approximately every 30 minutes, roll and water the sod that has been laid before continuing to sod the rest of the lawn. This assures good sod to soil contact so that the root system will be able to grow into the new soil.
When the sodding has been completed, irrigate it every day for the first 10 days, and then every second or third day until the roots are well established in the new soil. Keep the sod and the parent soil moist — but not wet — throughout the initial four to six weeks. Using these suggestions, you should be able to establish a beautiful, vigorous lawn that will give you many years of enjoyment.
For more information about this or other yard and garden topics, please call the Franklin County Extension office at 852-1097.
Most of the plants we use in our landscapes are non-natives. Many of them are quite poorly adapted to our local environment and soils, they require lots of water, and most of them have a longer growing season than our native climate can provide. Consequently, we spend a lot of time trying to meet the special needs of these plants in order to keep them alive and thriving.
There is currently a growing interest in the use of native plants in our landscapes. There are many reasons for considering these plants. They use considerably less water, they require less maintenance, they are better adapted to our local soils, and they generally have a natural adaptation to our higher altitudes. This means less work on our part in the constant struggle to keep attractive plants alive.
The biggest problem we have in our climate is the limited water fall. We are dry enough here, that we have to apply anywhere from 20 to 30 inches of water during the summer months just to meet the basic needs of these non-native plants to keep them green and healthy. Here locally, we only receive about 14 inches of water annually. Most of that comes during the winter months. This past summer, we received very little rain as we suffered through several very dry months. Wouldn’t it be great if you could put plants in your yard that would thrive under these drier conditions?
Steve Love, Ph.D., University of Idaho Extension horticulture specialist, has spent the past several years studying native plants of Idaho and surrounding states to find species that could be adapted for use in home landscapes. He has gone on many seed collecting trips high in the mountains of the region so that he could plant the seeds in his plots and evaluate the resulting plants for desirable characteristics. He looks for characteristics such as winter survivability, flower color and intensity, adaptability to valley soils and ease of establishment. Some of the species he has selected are now being sold commercially.
Love and some of his colleagues have written a bulletin called “Landscaping with Native Plants, BUL862.” It is available at no cost for download on the University of Idaho Extension website and is full of great information about how to establish a native plant garden in your own landscape. I recommend this publication to anyone who is considering this type of change to their yard.
For more information, please call the UI Extension office in Franklin County at 208-852-1097.